Creating and Scheduling Collector Jobs
Proceed as follows to create and schedule a collector job:
-
Go to the Collector jobs tab.
-
Click Create collector job.
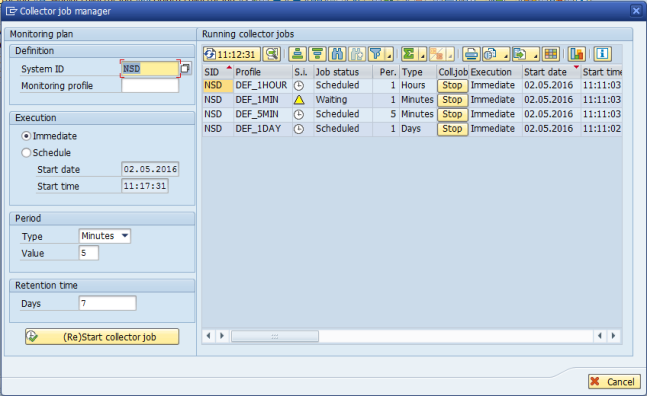
The Collector job manager window is displayed. This window has two subscreens:
-
Monitoring plan: Allows you to create a new collector job or edit an existing one.
-
Running collector jobs: Provides an overview of already created collector jobs.
-
-
Fill out all the required fields as shown in the figure below.
-
Definition:
-
System ID: Specifies the system on which you want to monitor KPIs.
-
Monitoring profile: Specifies the monitoring profile of the KPIs. You can check the monitoring profile of your KPIs by clicking Monitoring settings > KPI definitions > Assigned profiles.
NOTE You can create and assign a KPI to multiple monitoring profiles, but only one of these profiles will be enabled during the monitoring.
If you assign a KPI to multiple monitoring profiles, see the instructions on how to start or stop the monitoring of a KPI with a monitoring profile.
-
For more information about monitoring profiles, see the chapter Defining Monitoring Profiles for KPIs.
-
Execution: Specifies the execution of the collector job:
-
Immediate: The collector job is executed immediately after it is started or restarted.
-
Schedule: The collector job is executed on a specific date and at a specific time.
-
-
Period: Specifies the time interval between the collector job runs.
-
Retention time: Determines how long data is stored on the central monitoring system. Once the retention time has elapsed, the data will be deleted.
NOTE The retention time does not apply to data that belongs to a time interval that you specified before. For more information about time intervals, see the chapter Storing Data Defined Through a Time Interval.
-
After creating or editing the collector job, click (Re)Start collector job.
The name of the created collector job is displayed in the Background Job Name field. The following message appears: Collector job successfully started for system &1 and profile &2.
-
After starting the collector job, we recommend checking the status of its execution. To do so, check the icon in the Collector jobs tab in the Last status column. The following statuses exist:
-
 – Finished: The last background job of the collector job was finished successfully.
 -
 – Aborted: The last background job of the collector job was aborted due to an error or canceled by the user.NOTE To check the reason for a collector job abort, go to the Messages tab or click Background Job Name for the aborted collector job.
 -
 – Not running: The background job of the collector job has not been started.
-
-
Go to the KPI charts tab to display the results of the monitoring. For more information about displaying KPIs, see the chapter Displaying KPIs.
-
The collector job has been created and/or scheduled.
Changing the Monitoring Settings of a Collector Job
You can change the settings of an existing collector job.
To modify a collector job, go to the Modify collector job tab. Then proceed as described above and edit the values you want to change.