SAP Web Dispatcher
The prerequisite for adding a system for the SAP Web Dispatcher is to have a configured HTTP destination to an external server. For more information, see the steps required for the configuration in the chapter Configuring an HTTP Destination for the SAP Web Dispatcher.
Proceed as follows to add a new system for SAP Web Dispatcher monitoring:
-
Start transaction /DVD/MON.
-
In the main toolbar, click Add system (Shift+F1).
-
Select the main system type SAP Web Dispatcher.
-
Click Confirm.
-
The screen System for SAP Web Dispatcher appears.
-
In the Destination field, enter the configured HTTP destination.
-
Click Check HTTP.
If any error occurs, the HTTP destination is not configured correctly. You can check and maintain the HTTP destination by clicking Maintain HTTP or by starting transaction SM59.
-
The information is retrieved directly from the SAP Web Dispatcher, and relevant fields are prefilled automatically.
-
Optional: You can change the System description.
-
Optional: You can change the System name.
-
Click Confirm.
-
A screen appears with the auto-detected server for the SAP Web Dispatcher instance.
-
Ensure that the Monitor flag is selected.
-
Click Confirm.
-
The system for SAP Web Dispatcher monitoring has been added.
-
You can start the monitoring by clicking Start default monitoring in the menu bar. This starts the collector job with the profile WDISP_5MIN for the added system.
Configuring an HTTP Destination for the SAP Web Dispatcher
To communicate with the SAP Web Dispatcher and collect data, you must configure a valid HTTP destination for monitoring.
Proceed as follows to set up a valid configuration:
-
Start transaction SM59.
-
Click Create to create a new RFC destination.
-
In the RFC destination field, enter an RFC destination.
-
In Connection Type field, enter the value G (HTTP Connection to External Server).
-
In the Description field, enter a suitable description.
-
Go to the Technical Settings tab.
-
In the Target Host field, enter a valid target host.
-
In the Service No. field, enter a valid service number (port).
-
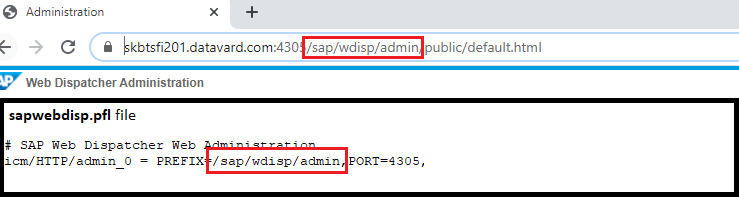
You can retrieve the host and port values from the URL, which is configured for SAP Web Dispatcher administration interface access.
-
In the Path Prefix field, enter a valid path prefix. This is the configured path for SAP Web Dispatcher administration interface access.
You can also retrieve this path from the same URL as described above or from the configuration file sapwebdisp.pfl, which is available in the installation directory for the SAP Web Dispatcher.
-
Go to the Login & Security tab. For HTTP connections, proceed with step 11. For HTTPS connections, proceed with step 12.
-
For HTTP communication, the following details are required:
-
Select the Basic Authentication option.
-
In the Logon area, fill out all the fields for the SAP Web Dispatcher administration user.
-
-
For HTTPS communication, the following details are required:
-
Select the Basic Authentication option.
-
In the Logon area, fill out all the fields for the SAP Web Dispatcher administration user.
-
In the SSL field, select Active.
-
Assign a valid SSL Client Certificate. To do so, you must create an SSL Client Identity as described in the chapter Configuring the SSL Client Identity for an HTTPS Connection.
-
-
The setup is complete.
Connection Test
Once you have configured all the required fields as detailed in the steps above, click Connection Test.
After the test execution, in the Test Result tab, you must receive an HTTP response status with the value 200. Otherwise, the configuration was not successful.
Configuring the SSL Client Identity for an HTTPS Connection
To add a certificate to SAP, create a new SSL client identity or use an existing SSL client identity (Anonymous or Standard) in transaction STRUST.
Creating a New SSL Client Identity
Proceed as follows to create a new SSL client identity:
-
Start transaction STRUST.
-
In the menu bar, click Environment > SSL Client Identities.
-
Click New Entries.
-
Enter an identity and a description.
-
Click Save.
-
Return to transaction STRUST.
-
Right-click the new SSL identity node and select Create to create a PSE file for a new SSL identity.
-
The Create PSE window opens.
-
Enter the required PSE options:
-
Name
-
Org. (Opt)
-
Comp./Org.
-
-
Click Confirm.
-
The new SSL client identity has been created.
Adding a Certificate to an SLL Client Identity
Proceed as follows to add a certificate to an SSL client identity:
-
Start transaction STRUST.
-
In the menu bar, click Certificate > Import.
-
The Import Certificate window opens.
-
In the File path field, select your certificate file, e.g. *.pem, *.cer, etc.
-
Click Confirm.
-
Double-click the used SSL client identity to load it.
-
You can now view the file content in the Certificate area.
-
Click Add to Certificate List.
-
Click Save.
-
The certificate has been added to the SSL client identity.
In order for any SSL connections to work, the SAP system must have an active HTTPS service setup. To check this, start transaction SMICM, click Goto > Services and ensure that the list contains an HTTPS row that is marked as Active.